This article will take you through the steps needed to produce a 3D stamp from a 2D image file. This article will be easier to follow if you have some experience with Inkscape, Blender, and 3D printing. However the workflow is reasonably simple, and should be accessible even without experience.
The basic workflow will be:
- Convert image to SVG in Inkscape
- Import SVG into Blender
- Convert SVG to geometry in Blender
- Extrude geometry in Blender
- Add base of stamp using boolean modifiers in Blender
- 3D print
Lets pick an image by Lorc from game-icons.net and download it in black on a transparent background as a PNG.
![]()
Convert Image To SVG In Inkscape
Bitmaps like JPG and PNG are unsuitable for converting to 3D meshes. To avoid having to hand trace in Blender, lets use Inkscape to convert to SVG. To convert the image to an SVG:
- Open Inkscape
- Use File>Import to import your SVG file (you don’t need to alter the default import settings)
- Drag the image off the rectangular canvas
- Select Path>Trace Bitmap and set settings (as shown in the picture below) then click OK
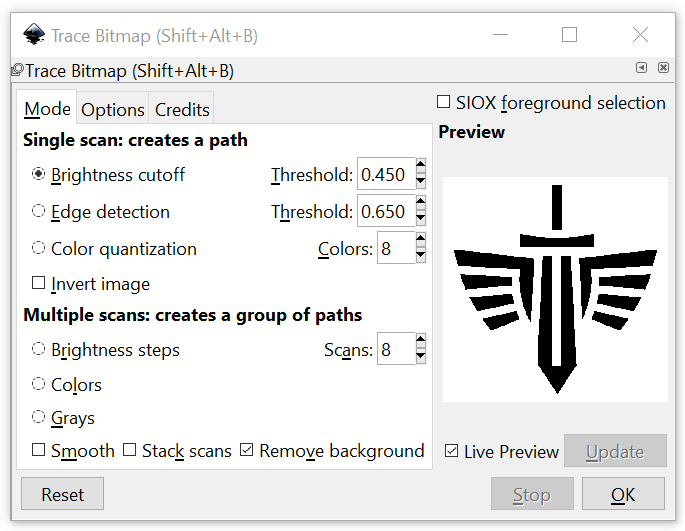
- Your SVG trace will appear on top of your original image
- Click and drag it onto the Inkscape canvas
- Click on your original image and press Delete to delete it
- Go to File>Save and save as Plain SVG
Inkscape is available from https://inkscape.org/. More information on tracing bitmaps can be found at https://inkscape-manuals.readthedocs.io/en/latest/tracing-an-image.html
If you already have your image in SVG format this initial step may not be necessary though you may still need to extract backgrounds. If you want to follow the rest of the tutorial without using Inkscape, you can download SVGs from game-icons.net as well. Be sure to set background to none for simplicity.
Import Into Blender And Convert To 3D Stamp
Now we need to convert our SVG to 3D. We shall do this in Blender
- Open Blender and delete the default cube, light and camera
- Go to File>Import>Scalable Vector Graphics (.svg) and import your SVG file
- Select the imported image (it should be near the origin on the XY plane so long as you did not move the 3D cursor)
- In Object Mode select Object>Convert To>Mesh to convert the SVG path to a triangulated mesh
- Hit Tab for Edit Mode and hit A to select all
- Hit E for extrude and drag the mouse. As your SVG was imported onto the XY plane you should find that the extrusion occurs along the Z axis
- Hit tab to return to object mode and drag your new object to the centre with G followed by X or Y depending which direction you want to move it
- Deselect your stamp mesh with Select>None
- Go to Add>Mesh>Cube and add a cube
- Reposition your cube with G(XYZ) and scale it with S(XYZ) so that your stamp mesh protrudes from one face of the cube
- If your stamp mesh includes any text, ensure that the stamping face shows the text reversed so that it will print correctly when used as a stamp
- On the properties panel for your cube, select the modifiers tab (wrench) and add a Boolean Modifier to the cube
- Select Union as the boolean type and click on the eyedropper tool in the object input field then select your stamp mesh (illustration below)

- Select the down arrow to the right of the modifier title and select apply (or Ctrl-A)
- You can now delete the layer group containing your stamp mesh as the cube now has the stamp protruding from one side
- Scale your stamp cube as desired with S and the mouse
- For some 3d printers and slicers it can now be advantageous to Tab into edit mode and select Face>Triangulate Faces
- Finally select your stamp and go to File>Export>Stl (.stl) to export for printing, being sure to check Selection Only.
Blender is available from https://www.blender.org/ with useful documentation at https://en.wikibooks.org/wiki/Subject:Blender_3D
3D Printing Your Stamp
How you print your stamp will depend a lot on what kind of 3D printer you have available. The workflow will be the same as for any other 3D print. I used an ELEGOO Mars 2 Pro (https://www.elegoo.com/) with the CHITUBOX slicer (https://cc.chitubox.com/) so my workflow was:
- Load the .stl file into the CHITUBOX slicer
- Scale and position on build plate image ensuring that the stamping face will not have any supports. This means face up in CHITUBOX. (Note that files from Blender seem to come into CHITUBOX) very tiny and may well need scaling up by as much as 10000%)
- Add a raft and supports if required to make the stamp easier to remove from the build plate
- Slice with your standard parameters
- Save the printer file to USB key ensuring it is saved in .ctb format (or the correct format for your printer)
- Plug USB key into 3D printer
- Select file and print
- Clean print with isopropyl alcohol
- Cure print with UV light box
Finishing And Using Your Stamp
Wearing a dust mask clean the print and sand the printing face to remove sheen and improve stamping quality. Rotate the piece as you sand to ensure that the bottom surface remains flat and level. Optionally you may want to glue your stamp to a piece of wood or other object to serve as a handle
The stamp should work with a standard inkpad. However unlike a rubber stamp your 3D printed stamp will likely be less flexible. Therefore for best results, place the paper to be stamped on a resilient but not completely hard surface like a cork mat, cutting mat, piece of leather or a soft backed book.

Text Stamps
For pure text stamps you can create your text directly in Blender. This avoids needing to convert text to SVG making it both quicker and more accurate. A good tutorial about text in Blender can be found at https://www.youtube.com/watch?v=SYLB8ejaNC4.
Once you have your text made, extrude it in the text settings and then in Object Mode select Object>Convert To>Mesh. From there you can proceed as above.
Wax Seals
If instead of using a boolean union you use a boolean difference modifier in Blender you can produce an indented stamp which can be used with wax or more durably hot glue for sealing or decorative purposes. As seals are often round you may want to use a cylinder as the basis for your seal model. Obviously you will need to print in a heat resistant resin or plastic for this purpose. It can be worth lubricating the stamp with petroleum jelly or a spray oil, to reduce adhesion between the stamp and the wax or glue.