For data science Postgres is rapidly becoming the go to database. As well as being highly scalable and durable, Postgres goes beyond being a SQL relational database. It also offers document database capabilities via its JSONB datatype, complete with specialised query options and GIN indexing. The pgvector addon gives Postgres vector database capabilities useful for RAG and semantic search. If this was not enough, Postgres 19 will soon offer some graph database capabilities, though efficiency will not be as high as dedicated graph databases like Neo4j.
This means it can often be useful to be able to quickly deploy a locally hosted Postgres database with pgAdmin for development purposes. Lets look at a neat minimal approach to do this. Here is a diagram of what we are going to build.
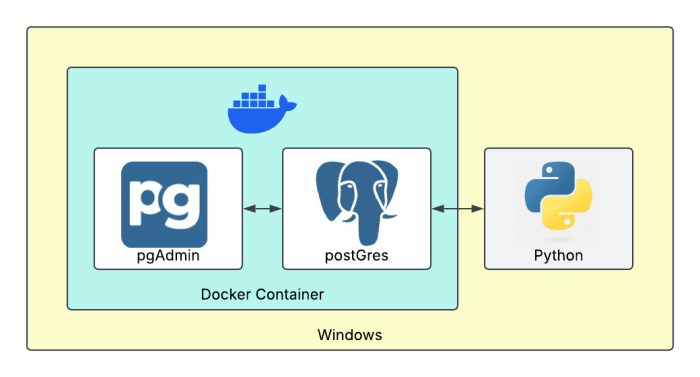
A Recipe for Local Dockerised Postgres
By deploying via Docker we can ensure a nice reproducible environment which can easily be recreated later on another machine or deployed to the cloud if required. Here is how to get this up and running. The following assumes a Windows machine, but the process will work on other systems with minimal modification.
Install Docker desktop
Docker Desktop on Windows requires up to date WSL2. So from PowerShell:
wsl --install
wsl --update
After this you will need to restart your machine then install Docker Desktop. You can register for a Docker Hub login if you desire, but it should not be needed to pull the public images we will be using.
Create Dockerfile
Now we can write our Dockerfile. lets call it docker-compose.yml
services:
  postgres:
    image: pgvector/pgvector:pg18
    container_name: pg_local
    restart: unless-stopped
    environment:
      POSTGRES_USER: ${POSTGRES_USER}
      POSTGRES_PASSWORD: ${POSTGRES_PASSWORD}
      POSTGRES_DB: ${POSTGRES_DATABASE}
    ports:
      - "5432:5432"
    volumes:
      - ${PGDATA_PATH}:/var/lib/postgresql

  pgadmin:
      image: dpage/pgadmin4
      container_name: pgadmin_local
      restart: unless-stopped
      environment:
        PGADMIN_DEFAULT_EMAIL: ${PGADMIN_EMAIL}
        PGADMIN_DEFAULT_PASSWORD: ${PGADMIN_PASSWORD}
      ports:
        - "5050:80"
      volumes:
        - ${PGADMIN_DATA_PATH}:/var/lib/pgadmin
      depends_on:
        - postgres
I have chosen to pull a variant Postgres image with pgvector included. This improves the flexibility of the database to cover more development use cases. I have also included a pgAdmin image with which to manage our Postgres instance.
To ensure that data we store in the Postgres database and settings for pgAdmin persist across restarts we will define mount volumes on our local system where the docker instance can persist data. We also port forward Postgres to localhost:5432 and pgAdmin to localhost:5050 so that we can access them from outside the container
Create .env File
You will notice that we are pulling a number of variables into this Dockerfile. This helps keep things portable and allow for proper secret handling if ever we want to deploy this in a more serious capacity. These variables should be defined in a .env file in the same folder as our docker-compose.yml
PGDATA_PATH=c:/Users/<username>/path/to/postGRES/store
POSTGRES_HOSTNAME=postgres
POSTGRES_USER=admin
POSTGRES_PASSWORD=password_for_postgres_database
POSTGRES_DATABASE=password_name
PGADMIN_EMAIL=admin@admin.com
PGADMIN_PASSWORD=password_for_pg_admin
PGADMIN_DATA_PATH=c:/Users/<username>/path/to/pgAdmin/store
Running the Container
Now these files are defined we are ready to run our docker container. From a command prompt run:
docker desktop start
docker compose -f "C:/Users/<username>/path/to/docker-compose.yml" up -d
On first start up things may take a short while as Docker pulls the requested container images to your local machine. However eventually you should get a response like:
[+] up 3/3
 ✔ Network jm-postgres_default Created  0.0s
 ✔ Container pg_local          Started  0.4s
 ✔ Container pgadmin_local     Started  0.5s
Here are a few more commands useful docker commands:
# to see what services are running
docker compose ps

# to stop containers and quit docker desktop
docker compose down
docker desktop stop

# to get recent logs for a container
docker logs --tail 50 <container_name>
You might also want to look at the Docker docs for Postgres.
Setting up pgAdmin
Now that Docker is serving your container, you can navigate to the pgAdmin instance in yout browser at localhost:5050. You should see a login screen and you can login using the .env variables you provided for PGADMIN_EMAIL and PGADMIN_PASSWORD.
Once this is done you can connect pgAdmin to your Postgres database. Here are instructions on connecting dbAdmin to a database or you may prefer a video tutorial. Once you right click on Servers and select Register>Server. You will get a dialogue panel. Put a name for your database in under General>Name and then go to the Connection tab. First we need the hostname or address. Note that when Docker Compose creates services inside a container it automatically assigns DNS entries for each service so that containers can reach each other by service name. This means that we can just enter postgres here. port will be 5432 as defined in the Dockerfile. Into username put the value you chose for POSTGRES_USER and into password , the value you chose for POSTGRES_PASSWORD. check the box to save the password if desired and then click save. The connection from pgAdmin to Postgres should now be set up.
Interacting with the Database via pgAdmin
Now we are connected to the database. But at present the database is empty. Lets quickly add a table and check we can retrieve data. First check that the connection indicator just above the main pane is pointed at your new database. It should read POSTGRES_DATABASE\POSTGRES_USER@POSTGRES_DATABASE depending on the values you have set in the .env file.
in the query panel you can conduct a quick test to ensure you can create a table, write data to it and read data from it:
CREATE TABLE pgtest(
  testval VARCHAR(10)
);

INSERT INTO pgtest (testval)
VALUES ('Hello World');

SELECT * FROM pgtest;
You should get one row returned. Also if you have created volumes correctly this data (and the login details to Postgres in pgAdmin) should persist across container restarts.
Interacting with Postgres Using Python
Wonderful we have Postgres working in a local container. However it would be nice to be able to reach it from Python so that we can send data or receive data between our Postgres database and Python.
To do this we shall make use of a couple of handy libraries. The dotenv library will allow us to load our .env file so that its contents can be reached by os.getenv. The psycopg2 library provides an easy way for Python to talk to Postgres. Here is a minimal script to get you started connecting to Postgres. Lets go and fetch that record we added to the pgtest1 table earlier.
from dotenv import load_dotenv
import os
import psycopg2

# set our paths and environment variables
dot_env_location = "C:/Users/<username>/path/to/.env"
load_dotenv(dot_env_location)
POSTGRES_USER = os.getenv('POSTGRES_USER')
POSTGRES_PASSWORD = os.getenv('POSTGRES_PASSWORD')
POSTGRES_DATABASE = os.getenv('POSTGRES_DATABASE')
# connect to postGRES
connection = psycopg2.connect(
    database = POSTGRES_DATABASE,
    user = POSTGRES_USER,
    password = POSTGRES_PASSWORD,
    host = 'localhost', # NOT 'postgres'
    port = 5432,
)
cursor = connection.cursor()
# run a SQL query
cursor.execute("SELECT * FROM pgtest")
# read the results into python
record = cursor.fetchall()

# expected result is [('Hello World',)]
print(record)
Note that because Python is connecting from outside the container, the host changes from postgres to localhost. Getting this wrong will result in a failed connection.
Conclusion
Obviously there is a lot more to know about Docker, Postgres, pgAdmin and Python. However by now you should have a basic Dockerised database which you can use for further experiments.
